Fascinated by all things miniature, it was only a matter of time before I tried my hand at Book Nooks.
I purchased a simple starter kit from Amazon to gain an overview of the basic construction and materials used, and I also researched other examples and tutorials on YouTube. This first attempt was a small, box-like version and was pretty limited in detail. But I did learn some things not to do—and others that can really enhance the
visuals. Simple as it was, a friend of mine was taken by it and asked that I make one with a Christmas scene for her. I saw this request as an opportunity to use my new knowledge and techniques to create a much better result.
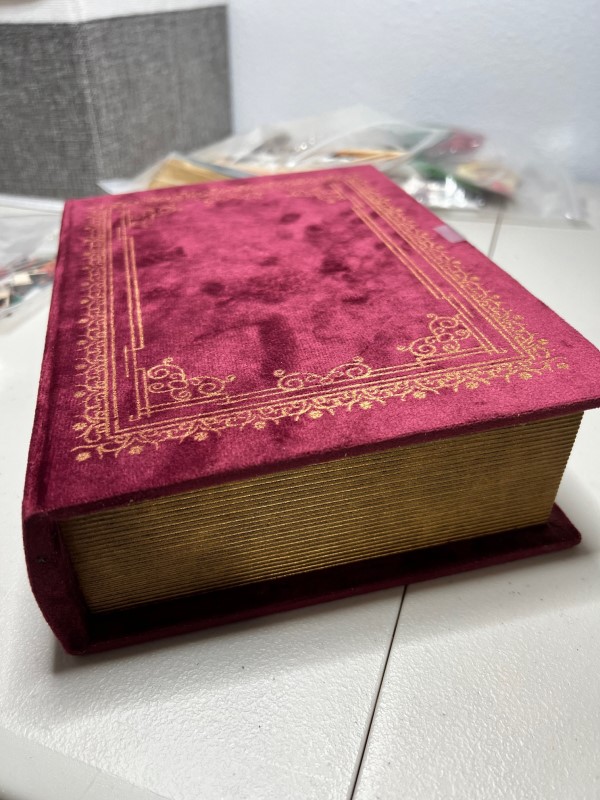
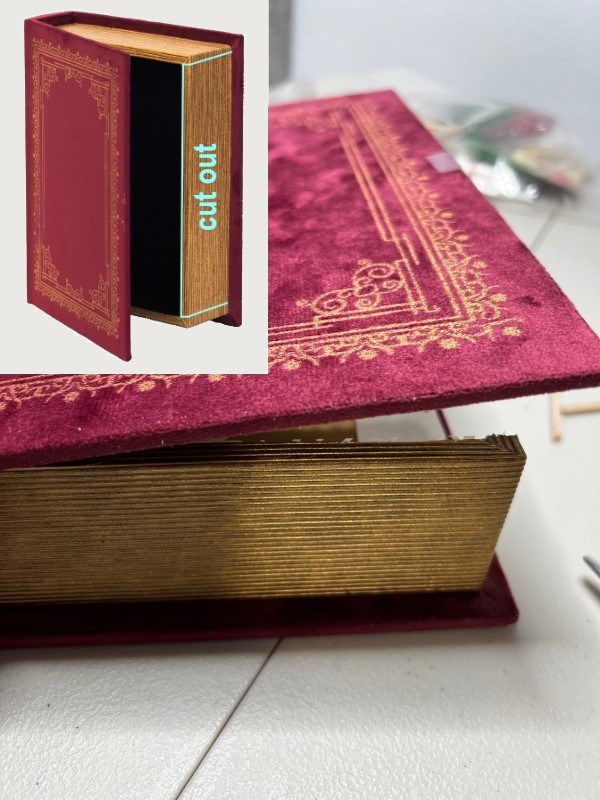
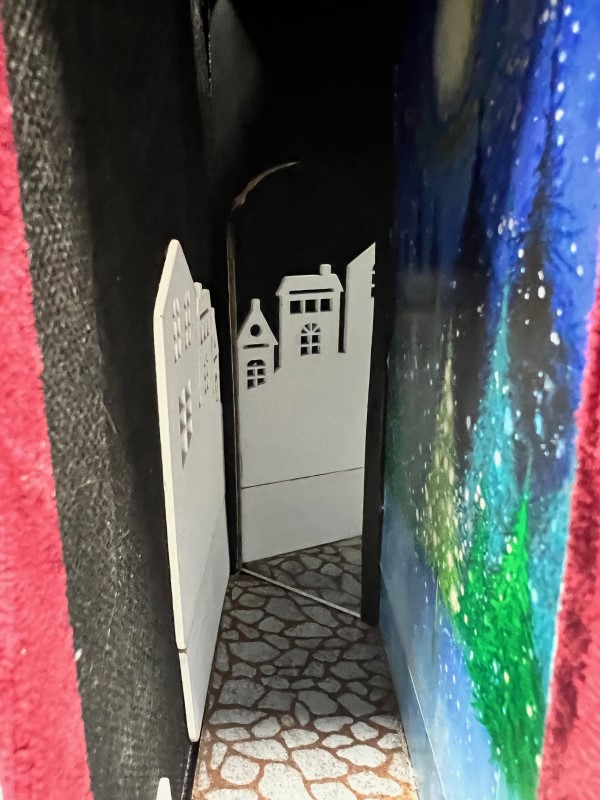
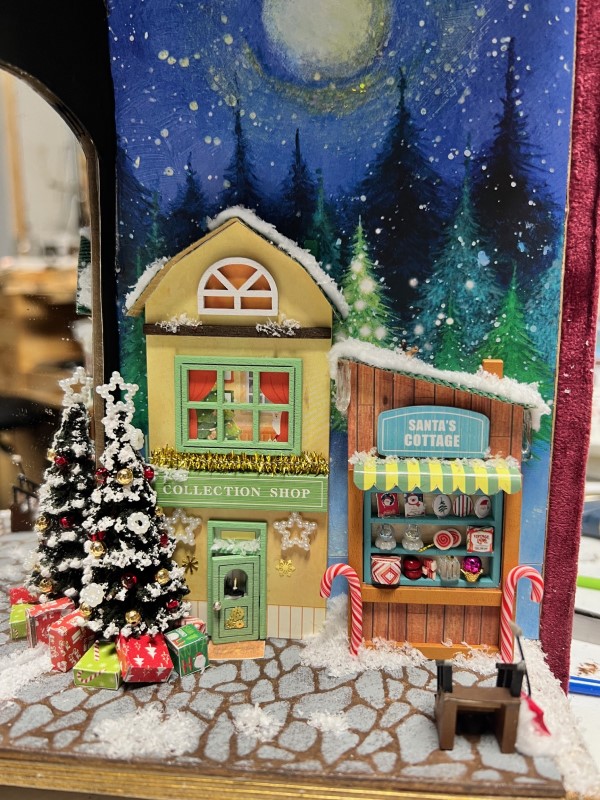
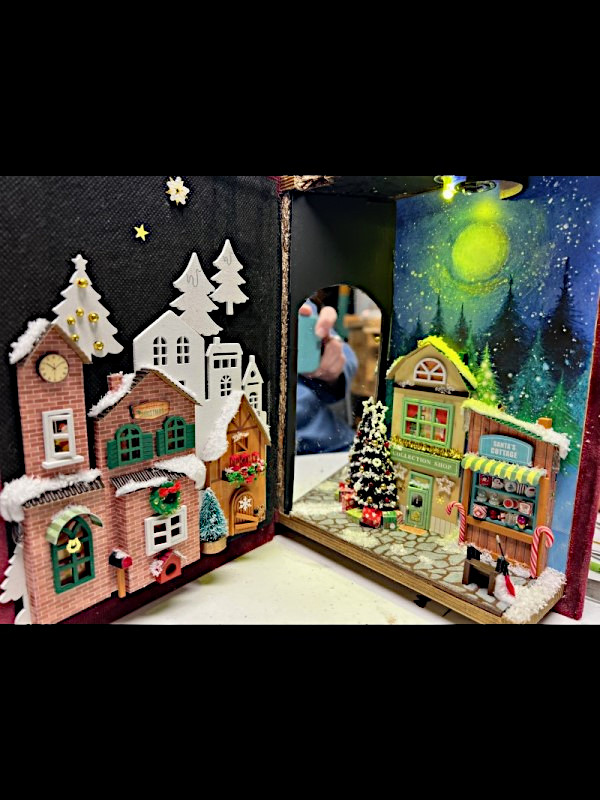
First, the book itself. I wasn’t thrilled with the “open box” look, like the one in the kit. I wanted an actual book box that I could modify - one I could work on while open for easier access until completed, and then close. Fortunately, I found some nice book options on Amazon. I chose a 7" by 9 ½" red velvet
version that fit the Christmas theme. I felt the size would have a nice presence on a bookshelf without being too large to fill adequately. The book did need to be modified, of course: the ends of the pages had to be cut off, and holes or pockets were required for wiring.
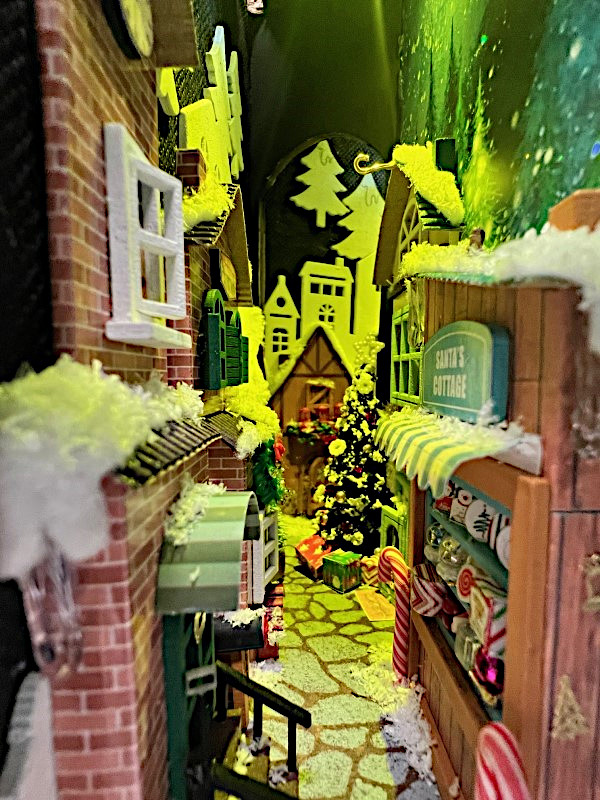
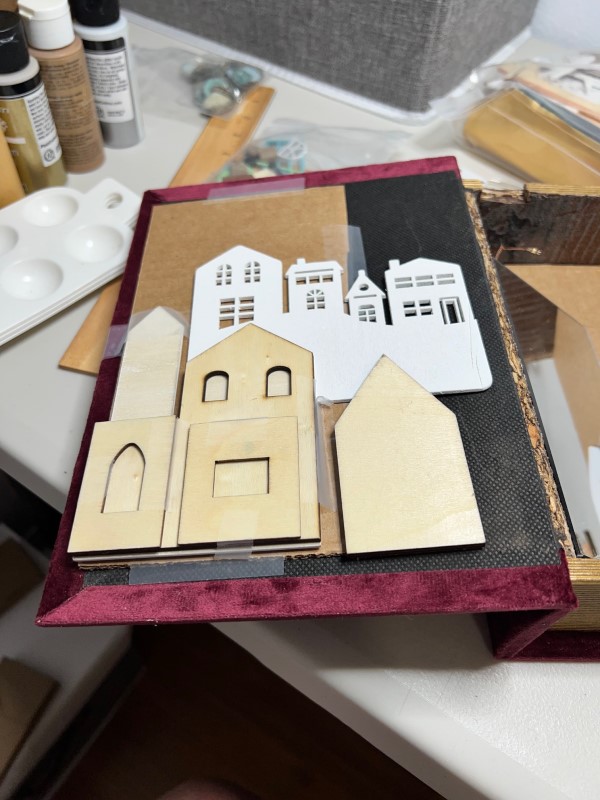
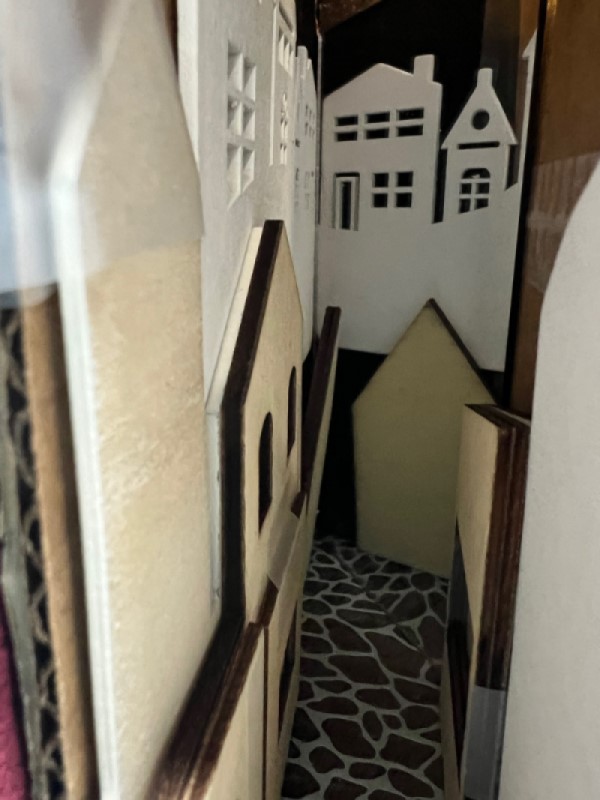
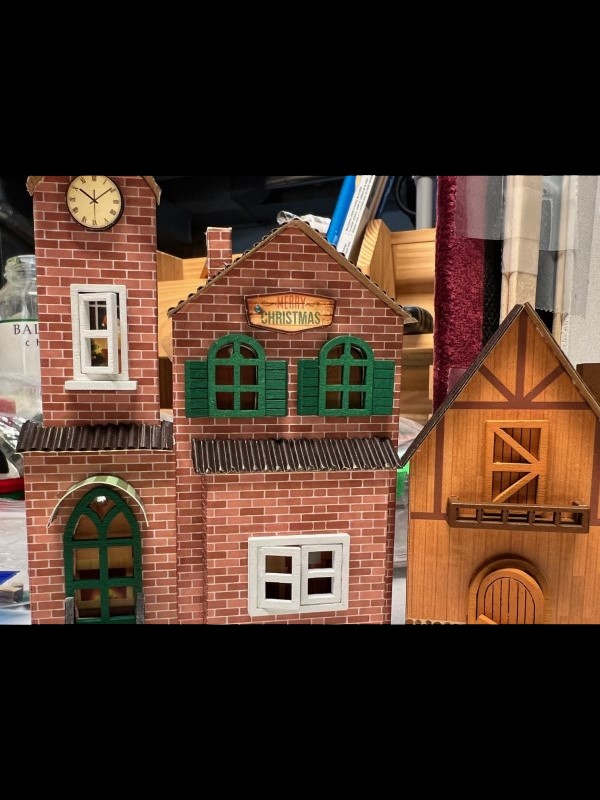
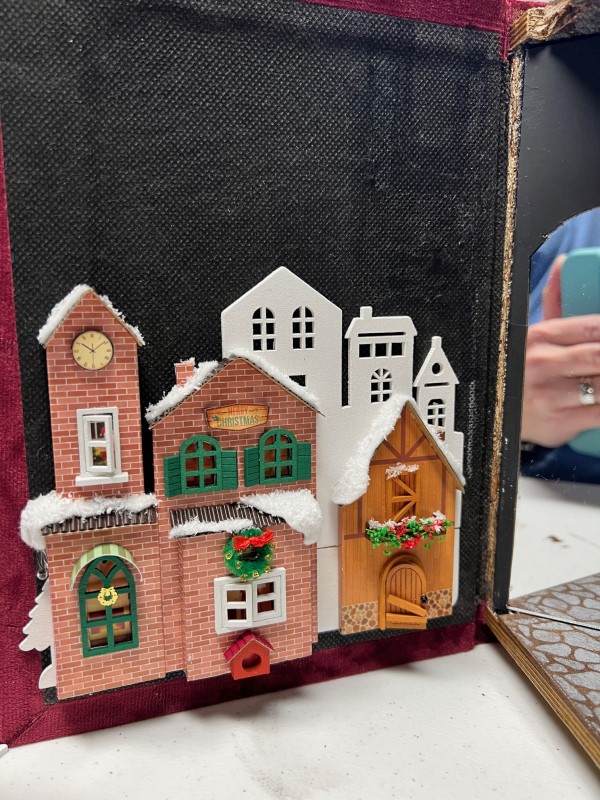
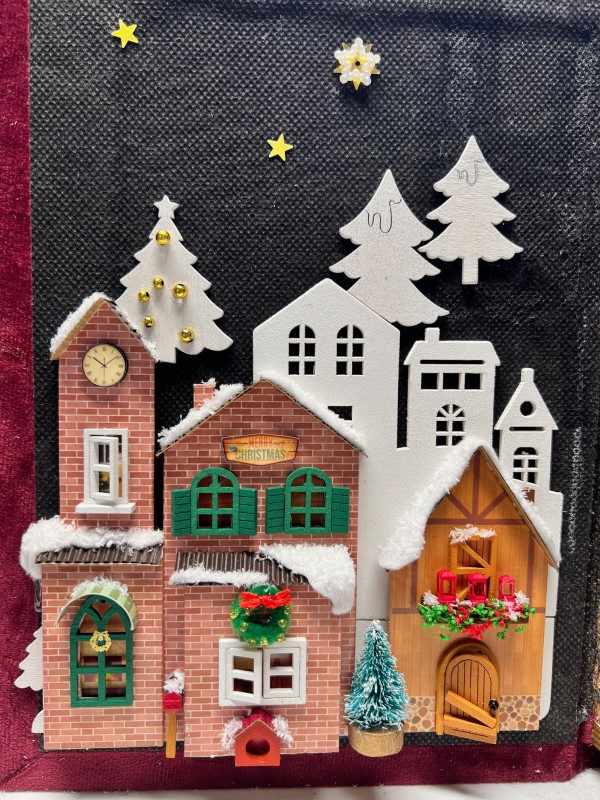
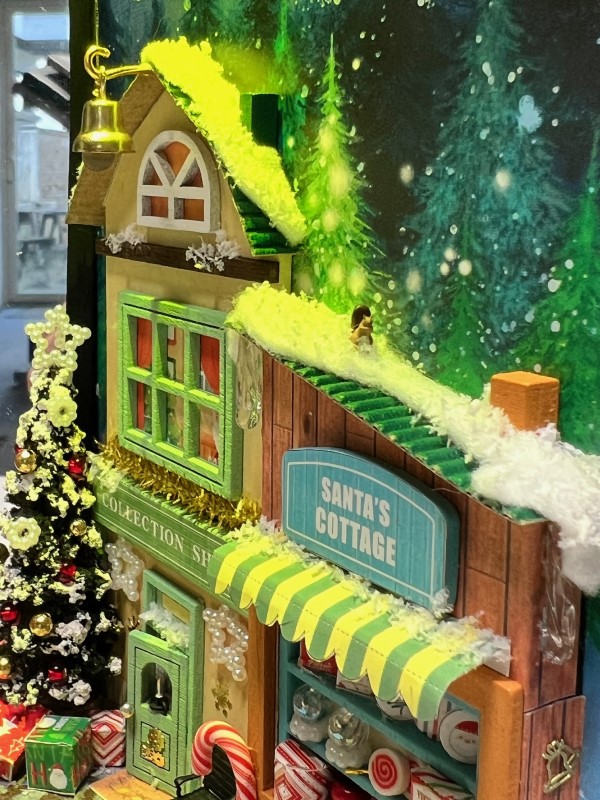
Next, plotting it out. The Christmas village scene was a given, but there are several approaches you can take, from the view down a street or town, an outdoor scene, a particular building or station, or looking into a specific room. I then just started with using paper and cardboard to plot things out and then
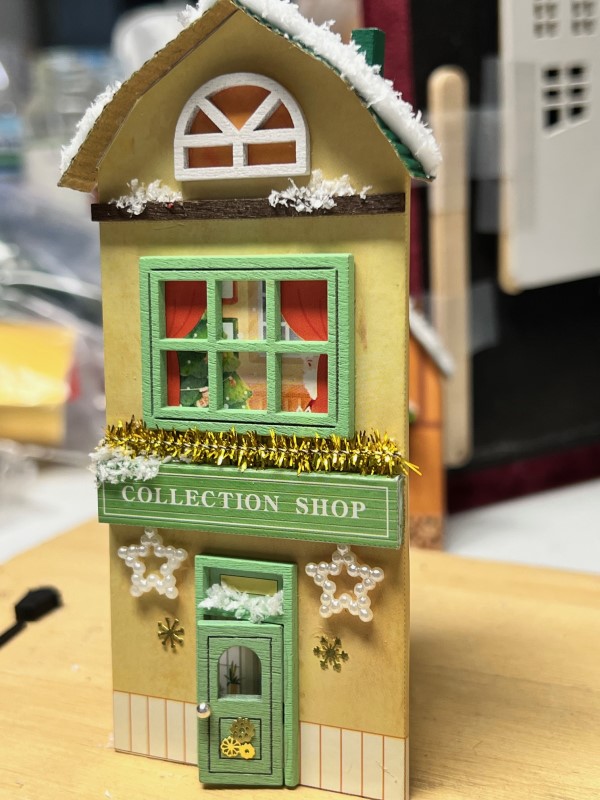
eventually basswood for the structures. The size you are going to make any structures is going to determine the scale of the miniatures you add to it. I found it can be challenging to keep everything in scale within the scene.
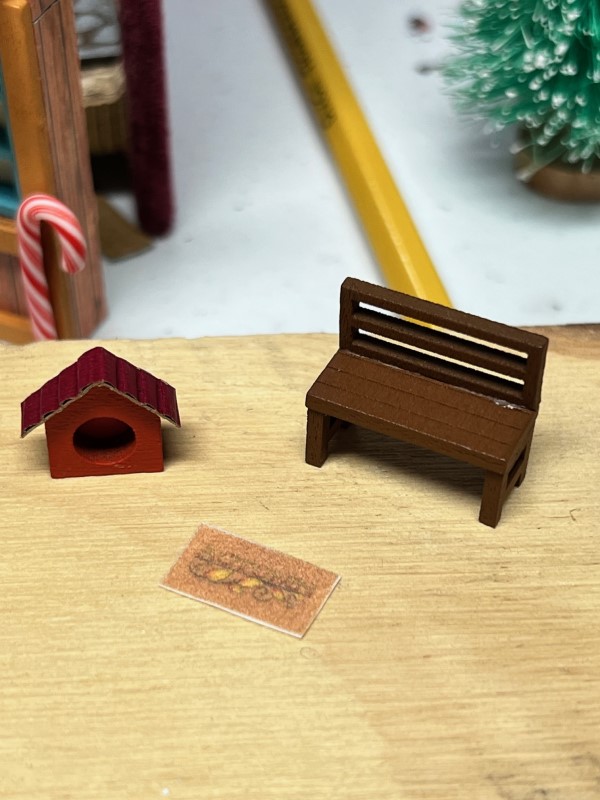
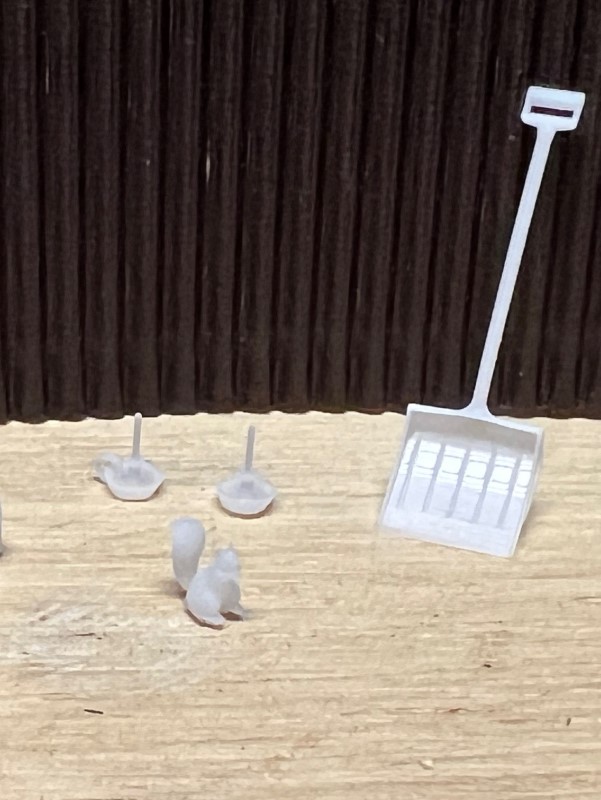
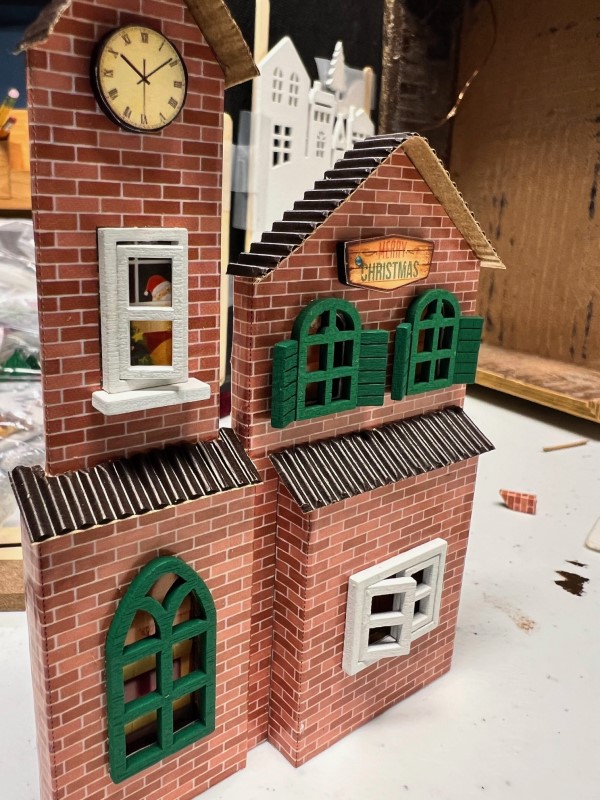
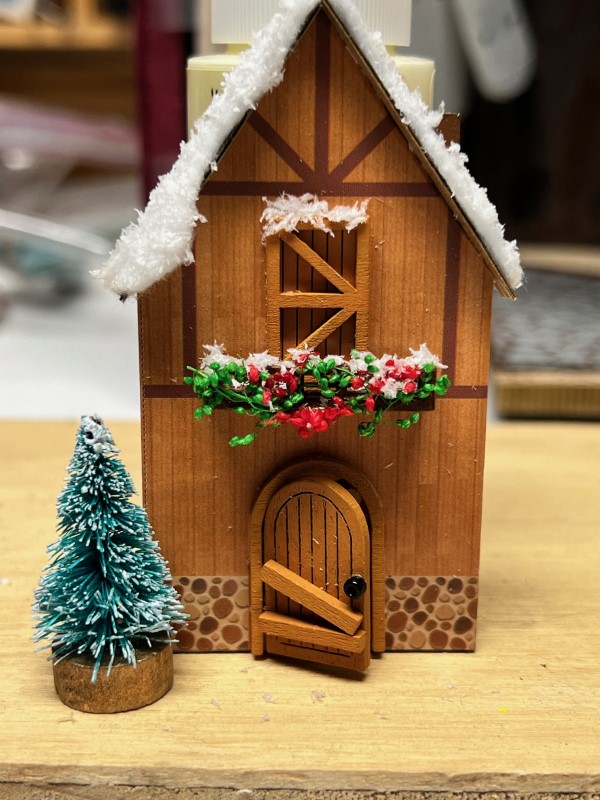
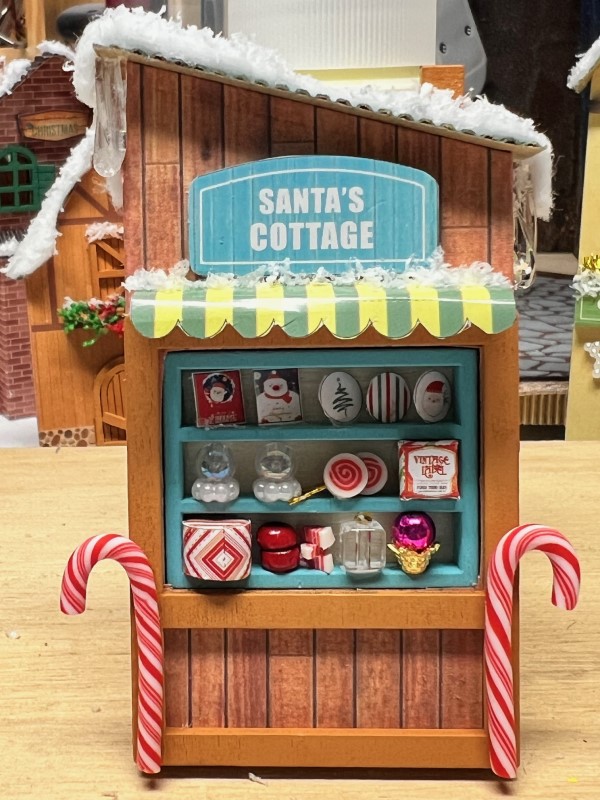
As for materials... I used basswood, balsa wood, beads, and polymer clay, and several pieces were from model trains and their scenery. I found dollhouse scale was too big for what I was doing. I made some of the
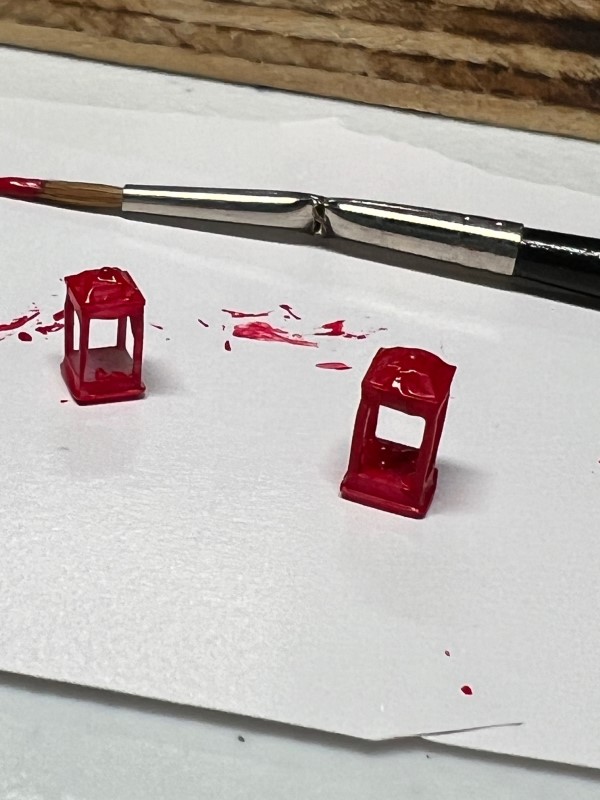
miniatures, purchased others, and found a nice selection on Etsy that are 3D-printed to whatever scale you need. You, of course, still have to paint them (get out the magnifier!). For the buildings, I cut out the patterns for the structures, windows, and doors. I then found the textures I was looking for in the way of wood
siding, stucco, or bricks - either as paper on Amazon, or printed from the internet and used to wrap the buildings or fill the window scenes.
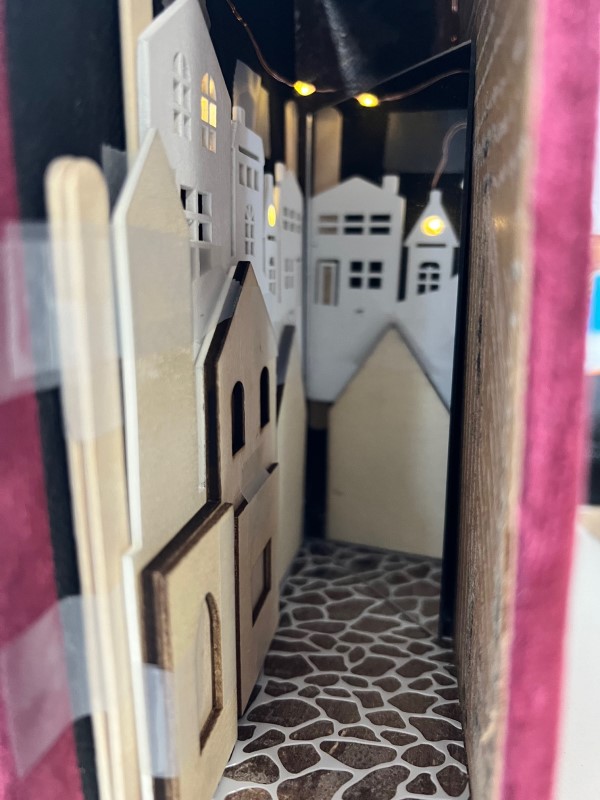
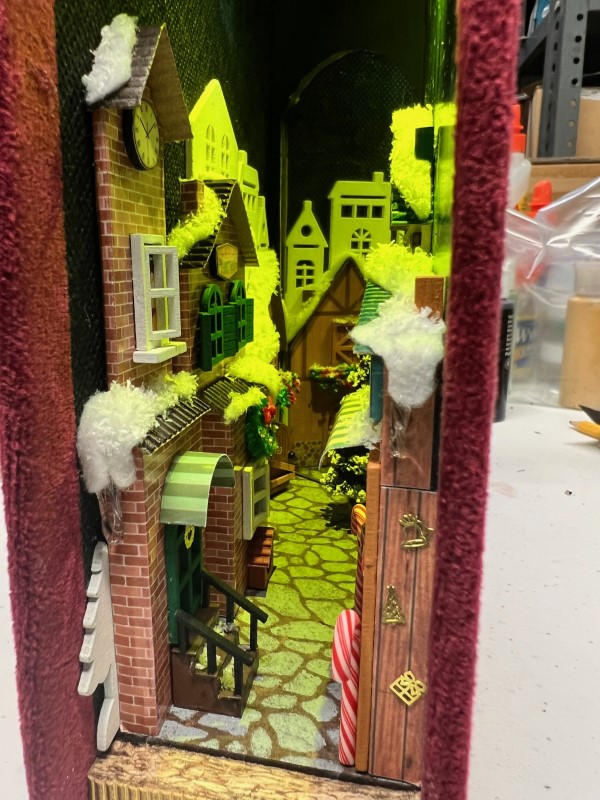
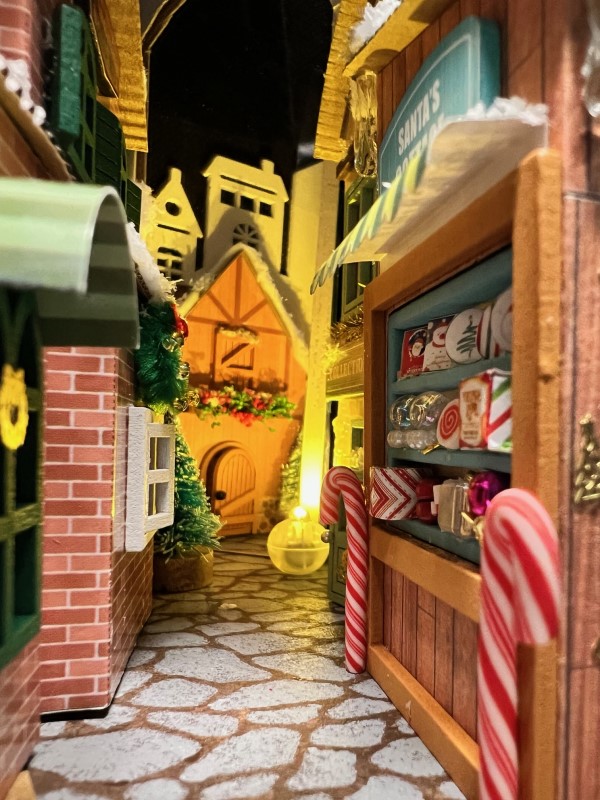
Tips and Insights In my research I picked up the technique of adding an angled mirror to the back of the nook and it creates an image of further depth. For my village, it gave the appearance that the street and buildings continued farther back than they actually did.
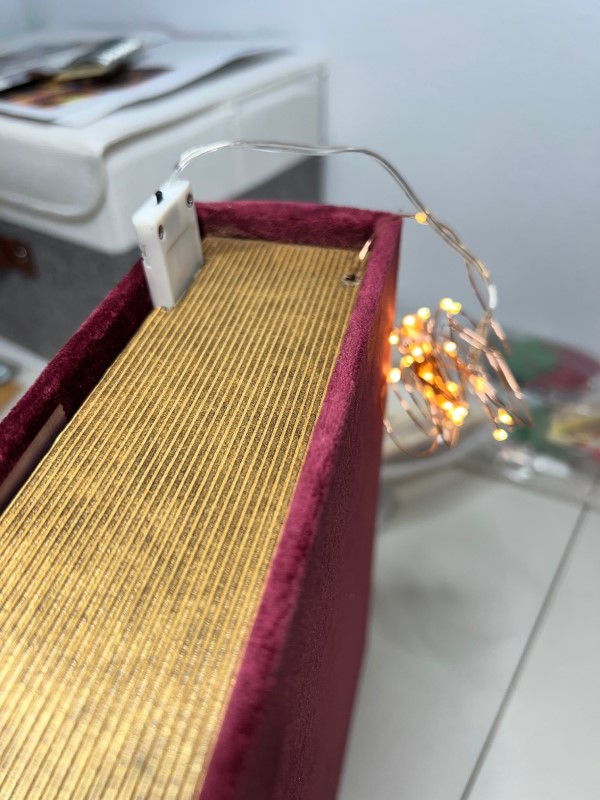
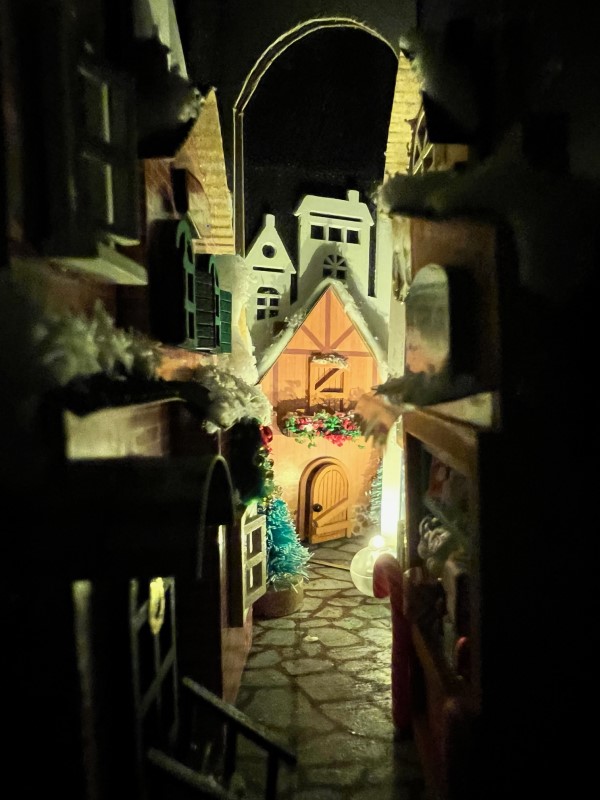
The last tip I have is on the lighting - it's a lot harder than I thought. My original idea was to use fairy lights played out behind the buildings and get the bulbs lined up in the windows and the switch was slid into a pocket at the top of the book. My first attempt was just taping the wire on the buildings and found
the wire was difficult to work with and had a mind of its own. Second attempt I at least got one side of the town wired with the fairy lights and upon closing the book to review they did not provide enough illumination to light up all the details within. Nice thought if you are going for a night scene or something,
but wasn't going to work here. So I tore it all out and started over, it's a process. It took some searching around, but I did finally find some small puck lights on Amazon that had a switching mechanism that could still be reached from outside the box.
Fascinated by all things miniature, it was only a matter of time before I tried my hand at Book Nooks.
I purchased a simple starter kit from Amazon to gain an overview of the basic construction and materials used, and I also researched other examples and tutorials on YouTube. This first attempt was a small, box-like version and was pretty limited in detail. But I did learn some things not to do—and others that can really enhance the
visuals. Simple as it was, a friend of mine was taken by it and asked that I make one with a Christmas scene for her. I saw this request as an opportunity to use my new knowledge and techniques to create a much better result.
First, the book itself. I wasn’t thrilled with the “open box” look, like the one in the kit. I wanted an actual book box that I could modify - one I could work on while open for easier access until completed, and then close. Fortunately, I found some nice book options on Amazon. I chose a 7" by 9 ½" red velvet
version that fit the Christmas theme. I felt the size would have a nice presence on a bookshelf without being too large to fill adequately. The book did need to be modified, of course: the ends of the pages had to be cut off, and holes or pockets were required for wiring.
Next, plotting it out. The Christmas village scene was a given, but there are several approaches you can take, from the view down a street or town, an outdoor scene, a particular building or station, or looking into a specific room. I then just started with using paper and cardboard to plot things out and then
eventually basswood for the structures. The size you are going to make any structures is going to determine the scale of the miniatures you add to it. I found it can be challenging to keep everything in scale within the scene.
As for materials... I used basswood, balsa wood, beads, and polymer clay, and several pieces were from model trains and their scenery. I found dollhouse scale was too big for what I was doing. I made some of the
miniatures, purchased others, and found a nice selection on Etsy that are 3D-printed to whatever scale you need. You, of course, still have to paint them (get out the magnifier!). For the buildings, I cut out the patterns for the structures, windows, and doors. I then found the textures I was looking for in the way of wood
siding, stucco, or bricks - either as paper on Amazon, or printed from the internet and used to wrap the buildings or fill the window scenes.
Tips and Insights In my research I picked up the technique of adding an angled mirror to the back of the nook and it creates an image of further depth. For my village, it gave the appearance that the street and buildings continued farther back than they actually did.
The last tip I have is on the lighting ... it's a lot harder than I thought. My original idea was to use fairy lights played out behind the buildings and get the bulbs lined up in the windows and the switch was slid into a pocket at the top of the book. My first attempt was just taping the wire on the buildings and found
the wire was difficult to work with and had a mind of its own. Second attempt I at least got one side of the town wired with the fairy lights and upon closing the book to review they did not provide enough illumination to light up all the details within. Nice thought if you are going for a night scene or something,
but wasn't going to work here. So I tore it all out and started over, it's a process. It took some searching around, but I did finally find some small puck lights on Amazon that had a switching mechanism that could still be reached from outside the box.
Below is a list of Amazon links for some of the materials I purchased for this project.